• Home
  • DIRECTV SWM Receivers, Installation & Configuration | Solid Signal

Installing & Configuring Receivers in a DIRECTV SWM System

The next step in our DIRECTV SWM Installation Guide involves powering the dish and installing the accessories you´ll need for the receivers you have. Whether you upgraded your LNB or added a multiswitch you will need a power inserter. The power inserter makes the SWiM system function. Find a location with AC power at least 15 cable feet from the dish or switch and run a line from the RED port on the splitter to the "POWER TO SWM" port. If you have an external switch, you can run a dedicated line from the "Legacy 3" port on the multiswitch instead.

There is a second port on the power inserter labeled SIGNAL TO IRD. This can be used to attach to a receiver, but it´s not recommended because of the risk of burning out the receiver if not connected properly.
After you have connected the power inserter, you are ready to change the receivers over to SWiM. If you have any non-DIRECTV-branded receivers, such as any Hughes, RCA, Sony, or Philips receivers, they should be replaced with new, SWiM-capable receivers. The DIRECTV D10, D11, R10, R15 and H10 receivers are also incompatible with SWiM and should be replaced.

Other receivers and DVRs may have B-band converters on the back. The B-Band converter allows HD receivers to work with the older system and are no longer used. If you see these grey or black boxes connected to the back of your receiver, disconnect them.

If you have DVRs with two lines attached, disconnect the line into "Satellite In 2." Use a cheap "barrel" connector (available at any home store or discount department store) to add a terminator to these lines if they aren´t used.

Changing Satellite Setup on a DIRECTV Receiver

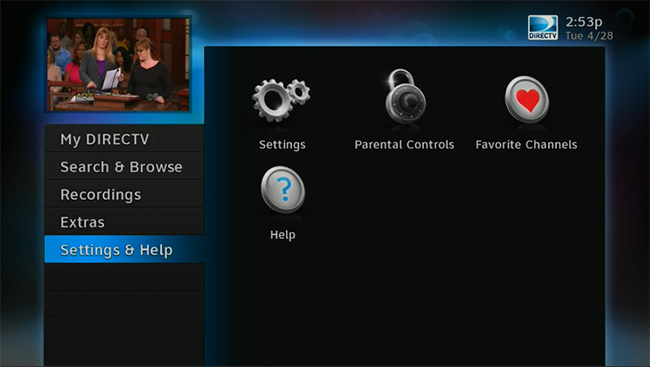
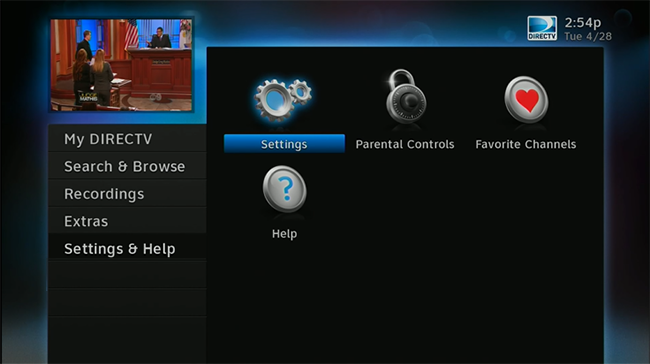
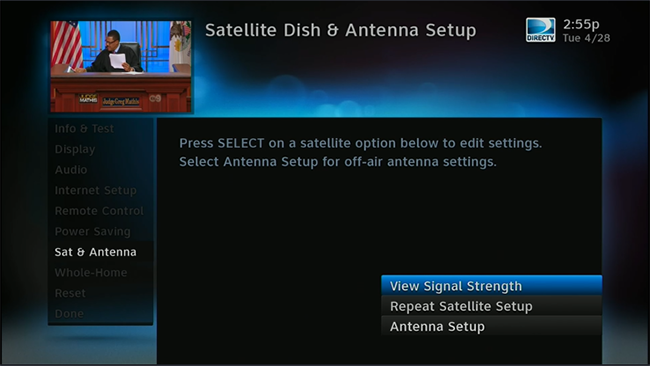
You´re almost done with this DIRECTV SWM installation guide! The next step: SWM/receiver configuration. You will need to change the satellite setup on every receiver. While this is often automatic, it´s important to know while installing SWM that you may need to set things manually. Here´s how.

Start by powering up the receiver and pressing {MENU}.

Arrow down to "Settings & Help" and press {SELECT}. Then, with "Settings" highlighted, press {SELECT} again.

Arrow down to "Satellite" and press {SELECT}. Then, arrow down to "Repeat Satellite Setup" and press {SELECT} again.

Because this process interrupts all programming, you will have to push the {DASH} button on the remote to continue. When you do, you will see the Satellite Setup menu. Here you can select the dish type you want and the multiswitch type. The dish type will probably be 04: Slimline 5 for a regular LNB, or 19: Slimline-3DS (DSWM) unless you have put in a different LNB. If the multiswitch type says "02: Multiswitch," change it to "01: SWM".Then arrow over and down to "Recheck SWM" and press {SELECT}.

When the settings are right, arrow over to "Continue," and press {SELECT}.

The receiver will then go through its automatic setup and retrieval of guide data. This can take several minutes. When it´s done, you will have the option to set up the remote if you wish. When setup is finally done, you can watch live TV or view the guide.

Solid Signal has several guides available to help you upgrade your system. Choose the guides you need!

DIRECTV SWM Installation Guide For DIY Amateurs & Pros

How to Upgrade an Existing DIRECTV Slimline Dish with a New LNB

Do You Need The New SWM-13 LNB for Your DIRECTV Dish?

Install An External SWM Multiswitch to Your DIRECTV Dish

Connecting Your DIRECTV System Receiver to the Internet